


Loxone Integration
Primary integration path for SpotpriceAPI: Loxone Miniserver with Virtual Output (HTTPS) + PicoC. The same API endpoints are open for any system (Home Assistant, Python, cURL) — Loxone is just the best-documented path. Community free: 120 requests/day, no credit card.
This section connects SpotpriceAPI to a Loxone Miniserver — the box that runs your smart home. You can show electricity prices, pick cheap hours, or charge a home battery when power is cheapest.
No prior Loxone or PicoC experience required. Read this page first, then open the guide that matches your goal.
What problem are we solving?
Electricity price changes every hour. A battery or heat pump should run more when power is cheap. SpotpriceAPI knows tomorrow’s prices and can say “charge for 3 hours starting at 2 a.m.” Your Loxone must get that answer and switch relays.
Why PicoC cannot call the API directly
PicoC is a small script language inside Loxone Config. It can read sensors, do math, and read/write files on the Miniserver. It cannot:
- Open HTTPS connections to the internet
- Send HTTP headers like
X-API-Key
So PicoC alone cannot talk to https://api.spotpriceapi.com.
Why Virtual Output holds the API key
Virtual Output (also called Virtual HTTP Output in some versions) is a Loxone block that can call HTTPS. You configure:
- URL (
https://api.spotpriceapi.com/v1/...) - Header
X-API-Key: sf_live_YOUR_KEY - Save response to a file, e.g.
/user/common/spotprice_hours.json
The key lives only in the Virtual Output settings in Config — not inside PicoC source. PicoC then reads the saved JSON file and turns numbers into outputs for relays and the Spot Price Optimizer.
One host, several commands
Loxone does not share commands — it does share the parent Virtual Output.
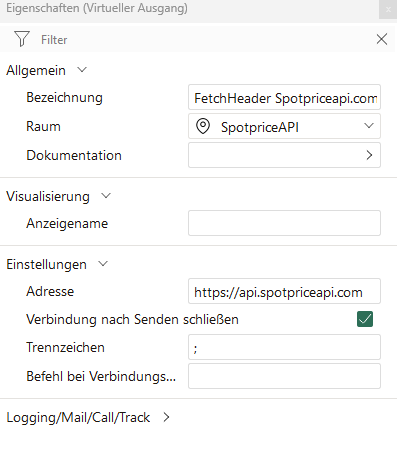
Create one Virtual Output as a header (address = host). Hang the HTTP commands underneath (telemetry, PV, forecast, …). That keeps the peripherals list tidy.
Parent (host only)
| Field | Value |
|---|---|
| Name | e.g. FetchHeader Spotpriceapi.com |
| Address | https://api.spotpriceapi.com |
| Close connection after sending | on (typical) |
Commands underneath
One command per API (path, header with key, save path). Example: telemetry SOC/meter + FetchPvForecast under the same parent.
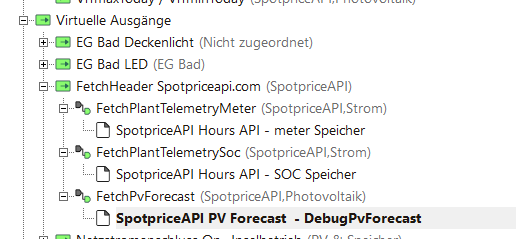
If Hours (or Forecast) already has the host: do not add a second host VO — only add the missing command. Details: each guide (Virtual Output step).
Max 8 PicoC programs per Miniserver. Recommended: Hours 2 + Flex 1 + Forecast 2 + PV 2 = 7/8. Skip weather (Tmin/Tmax are already on the PV display). Without Flex you stay at 6/8.
When each auto-fetch runs
HTTPS pulses are staggered on purpose:
| Minute | What | PicoC |
|---|---|---|
| :00 / :15 / :30 / :45 | Telemetry (if I7=1) | FetchPlantHours |
| :01 | Prices GET | DebugSpotpriceFile |
| :03 | Windows GET Legacy (if I4=1) | DebugDecisionWindowsFile |
| :04 | Flex Windows POST (if I3=1) | SpotpriceFlexWindows |
| :00 | Hours Decide (if I8=1) | FetchPlantHours |
| :08 | PV days GET | DebugPvForecast |
| :10 | Weather GET | DebugPlantWeather |
Forecast, PV and Weather also fetch on start (~3 s). Hours Extract reads an existing spotprice_hours.json on start (Demand after reboot).
How the pieces fit together
Battery SOC sensor ──┐
Grid meter ──────────┼──► PicoC Fetch block ──► pulses Virtual Output
Manual button ───────┘         │
                               ▼
                    Virtual Output (HTTPS + API key)
                               │
                               ▼
                    JSON file on Miniserver
                               │
                               ▼
                    PicoC Parse block ──► Spot Price Optimizer / relays / display
Which guide should I open? (after login)
| Your goal | Guide |
|---|---|
| Only upload SOC + meter (no charge plan) | Telemetry only |
| Home battery: how many hours to charge, when, at what price | Hours & telemetry (full) |
| I set the window + N myself (wallbox, relay, pool) | Flex Windows |
| Legacy: Count/Days with 2 PicoC blocks | Decision Windows v1 |
| Show current price on UI / test the connection | Forecast |
| Show PV daily yield + load/SoC text in the app | PV Forecast |
| Weather room / text displays (HTTP, not license block) | Weather |
Current PicoC versions
After login, copy the blocks from the detail guides:
| Block | Version | Guide |
|---|---|---|
| FetchPlantHours | v1.15 | Telemetry · Hours — SOC bands both ways + smart 15‑min + :00/:05 |
| ExtractHoursDemand | v1.17 | Hours — prefix + relay + 12 h fallback + Txt hours/kWh |
| DebugDecisionWindowsFile | v2.2 | Windows Legacy — auto :03 |
| ParseDecisionWindows | v1.4 | Windows Legacy |
| SpotpriceFlexWindows | v0.6.11 | Flex Windows — O1–O8 on/off, VO flex_pack <v.0>, auto :04, I6=0 = Sparvo, offline boot |
| DebugSpotpriceFile | v5.6 | Forecast — start + :01, O1=12 offline |
| ParseSpotpriceForecast | v18 | Forecast — boot + hour change |
| DebugPvForecast | v1.3 | PV Forecast — start + auto :08, O1=12 |
| ExtractPvDaily | v2.2 | PV Forecast — O1…O13 + Txt2/Txt3; 12h warn |
| DebugPlantWeather | v1.2 | Weather — start + auto :10 |
| ExtractPlantWeather | v1.1 | Weather — temp/wind/text; file also on start |
Offline fallback (from v5.6 / v1.3 / v0.6.11): JSON under /user/common/ is kept until a valid API fetch; on outage O1=12 (Forecast/PV) or switching from backup (Flex). See each guide for details.
Virtual Inputs — always analog
Wherever the guides mention Virtual Inputs (VI) as inputs (Windows Count/Days, weather display, …): they are numeric values, not switches. Hours needs no VIs — wire SOC/meter directly to Fetch and Analog Memory.
Not for PV Forecast display: values come from ExtractPvDaily O1…O13 / Txt* — directly or via optional Analog Memory, not via VIs.
| Setting in Loxone Config | Value |
|---|---|
| Use as digital input | off (otherwise only on/off — e.g. 13,5 kWh is lost) |
| Input type | not “Switch” — e.g. Analog / Slider |
| Status display only | on for pure display inputs (price, Windows outputs); off only if you deliberately change the value from the app (e.g. Windows Count/Days/Mode) |
| Monitor validation | off — otherwise Min/Max clamp the value (default often 0…100) |
| Unit | as in each guide’s table (kWh, %, °C, ct/kWh, …) |
Details are under Step 1 in every guide.
Wiring plan — overview
In Loxone Config you draw lines from an output to an input. Read each row as: “output … of … → input … of …”.
Recommended with battery (Hours)
Sensors / buttons → FetchPlantHours v1.15
                      ├─ O4 → VO Telemetry
                      ├─ O5 → VO DecideThin → spotprice_hours.json
                      └─ O1=10 → ExtractHoursDemand v1.17 I1 → Optimizer
                                                SOC → Extract I3
                                                O3 → relay · Txt3 hours/kWh
Step-by-step including Analog Memory: Hours & telemetry. SOC/meter only, no plan: Telemetry only.
Without battery math (Windows)
Count / Days / Button  →  DebugDecisionWindowsFile (PicoC)
                              ├─ O4 → VO FetchWindowsGlobal
                              ├─ O5 → VO FetchWindowsDayFirst
                              └─ O1 → ParseDecisionWindows I1
                                         ├─ O6 → Optimizer Demand
                                         └─ O7 → Optimizer Period
Details after login: Windows.
Prices only (Forecast)
Start / :01 (button opt.)  →  DebugSpotpriceFile I1
DebugSpotpriceFile O4  →  VO FetchForecast
DebugSpotpriceFile O1  →  ParseSpotpriceForecast I1
ParseSpotpriceForecast O1 / O2  →  display “price now” / “+1 h”
Details after login: Forecast.
PV daily yield (PV Forecast)
Start / :08 (button opt.)  →  DebugPvForecast I1
DebugPvForecast O4  →  VO FetchPvForecast
DebugPvForecast O1  →  ExtractPvDaily I1
ExtractPvDaily O1…O13 / Txt2 / Txt3  →  app / memory / logic
One fetch covers PV, load, end-of-day SoC and min/max — no extra weather PicoC for the same room. No Virtual Inputs needed for display.
Details after login: PV Forecast.
Weather display (HTTP)
Start / :10 (button opt.)  →  DebugPlantWeather I1
DebugPlantWeather O4  →  VO FetchPlantWeather
DebugPlantWeather O1  →  ExtractPlantWeather I1
Extract O1…O4 + Txt  →  displays
Only Tmin/Tmax in PV texts? Skip this guide — that is already in PV Forecast.
Details after login: Weather.
What you need before any Loxone guide
- Loxone Config on PC/Mac, connection to your Miniserver
- Free SpotpriceAPI account — Register — key
sf_live_YOUR_KEY - For battery setup: plant profile in portal (capacity, location, PV)
- Blocks used in all guides: PicoC, Virtual Output, Virtual Inputs
Portal checklist
- API key: Account → API keys → copy once
- Plant profile: for Hours/Telemetry (location, kWp, capacity)
- Code samples: logged-in Code Samples with your key pre-filled
API reference (for humans, not Loxone)
- Hours Demand · Plant Telemetry
- Decision Windows · Forecast
- Webhooks — optional; Loxone usually polls via Virtual Output
Common mistakes
- Pasting API key into PicoC source — use Virtual Output header only
- Virtual Input “Use as digital input” on — off; these are analog numbers, not switches
- Virtual Input “Monitor validation” on — off; otherwise Min/Max clamp values
- Expecting PicoC to fetch URLs — it reads files after Virtual Output runs
- Fetching every few seconds — Community tier is 120 calls/day; use hourly auto-fetch in our scripts
- Skipping plant profile then wondering why
incomplete_inputappears
Next steps
Register or sign in, then open Hours & telemetry — start with Step 0.
Unlock
Detail guides after login
The overview stays public. Hours, Windows, Forecast, PV Forecast and Weather with PicoC need login and at least Community.
- Hours & telemetry — battery demand for Spot Price Optimizer
- Decision Windows — wire a fixed hour count
- Forecast — price now / +1 h in the app
Register for Community or code samples with your personal key.